Frame Layout
Frame Layout is where QUI stops feeling like a preset and starts feeling like your UI. It gives you the visual editing tools to place, anchor, and organize the HUD without guessing at coordinates.
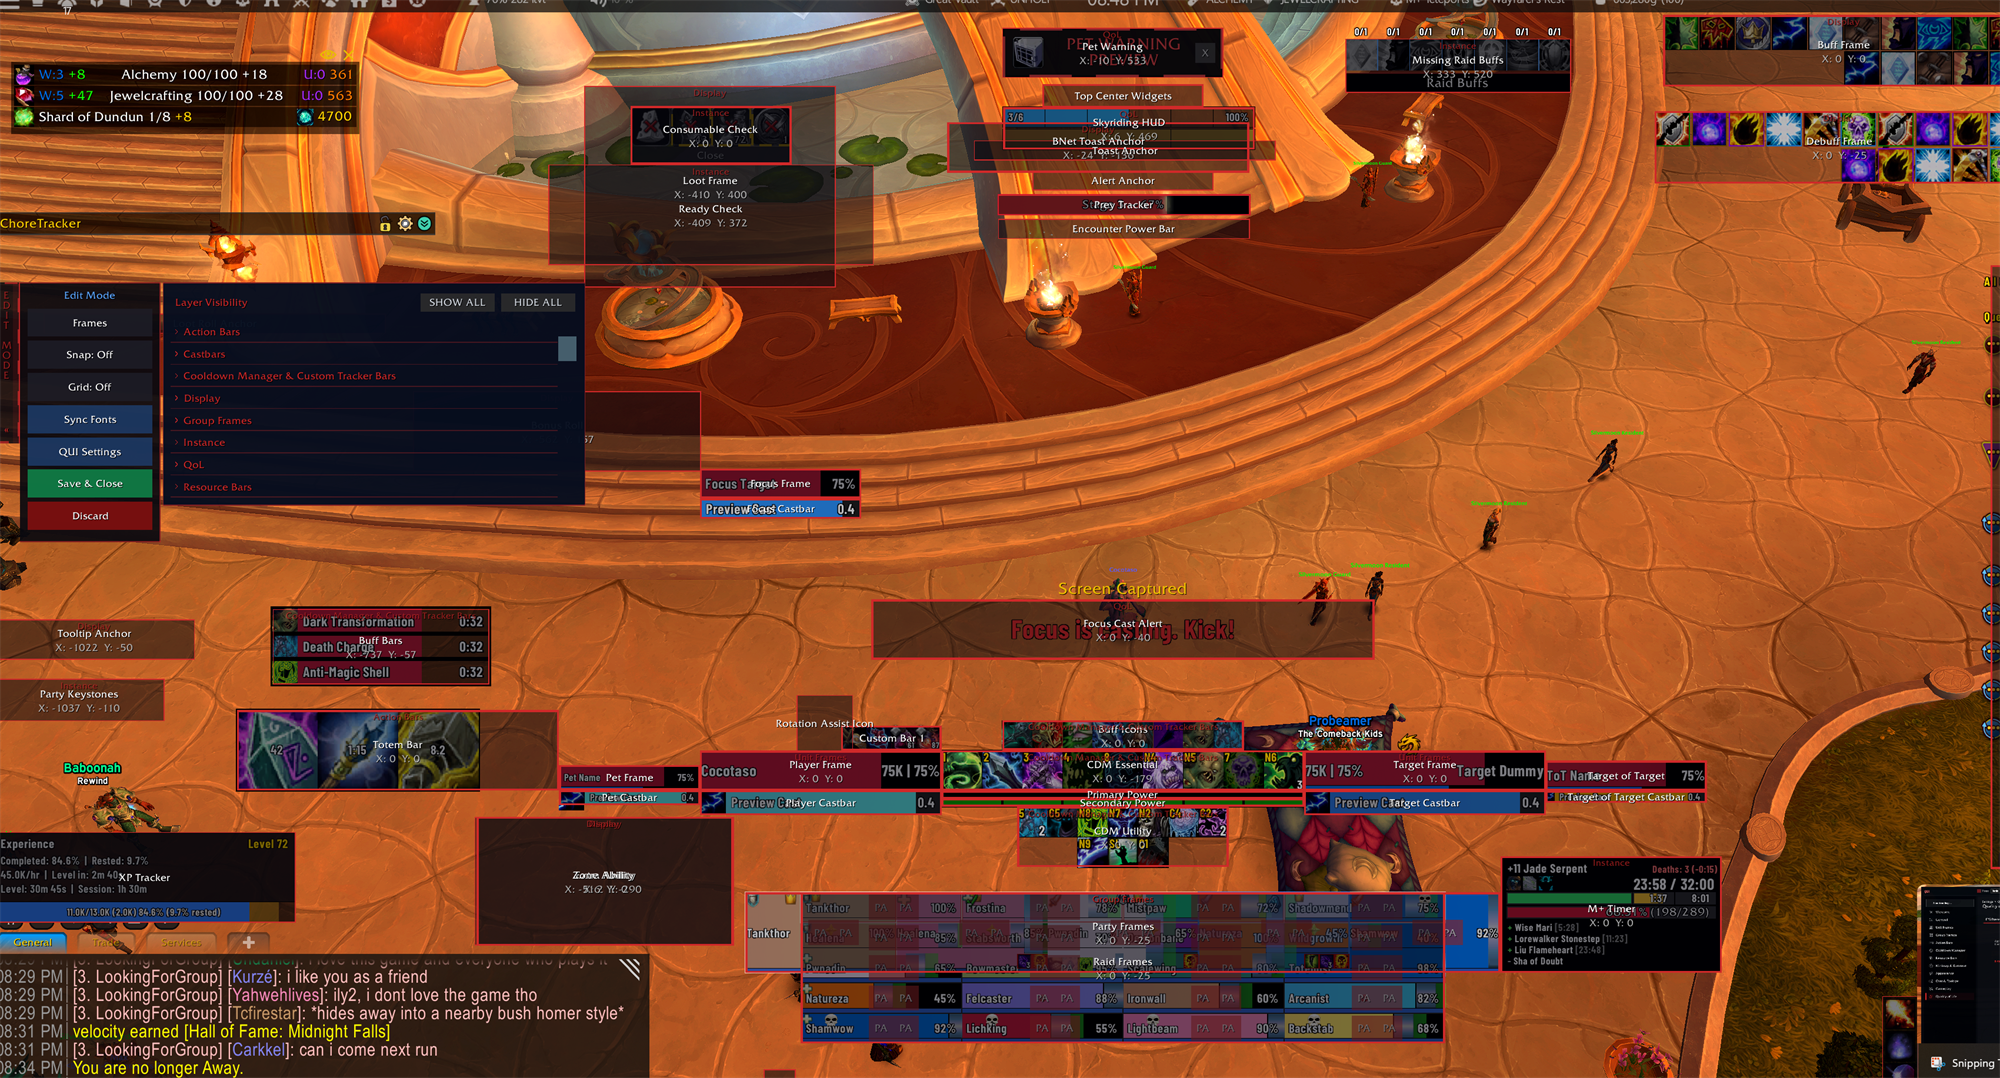 Layout Mode is the visual editing layer for frame movers, anchors, group handles, and on-screen positioning.
What Layout Mode Solves
- Moving a whole cluster instead of nudging each element separately
- Keeping related frames spaced consistently
- Avoiding overlaps and visual clutter
- Making the HUD feel centered around your own eye movement, not a preset screenshot
- Resizing anchored chat or damage meter windows without drifting off the saved anchor
How to Configure
Frame layout settings are spread across several locations:
- Layout Mode (
/qui layout) for drag-and-drop positioning and layout-side settings. It opens with the toolbar panel and frames drawer collapsed for a cleaner start – expand them as you need them. - Appearance > HUD Visibility in
/quifor when elements appear or fade - Appearance > Frame Levels in
/quifor which elements render above others - Edit in Layout Mode buttons inside feature pages when you want to jump straight from a settings panel to placement
Best First Workflow
- Place your Essential CDM first.
- Position player and target frames around it.
- Anchor nearby elements so they move together.
- Drag the parent element to confirm anchored children follow live.
- Save once the major clusters are stable, then fine-tune exact offsets in settings.
Anchored Frames
QUI’s anchoring system lets one element follow another. In current QUI 4 builds, anchored children update live while you drag or nudge the parent. This applies to direct children, deeper chains, and frames anchored through a mover handle.
Anchored windows and castbars stay put in Layout Mode. A castbar anchored to a unit frame – such as the target-of-target castbar – shows at its real anchored position instead of jumping to screen center. Anchored chat windows keep their normal mover.
Anchored chat and damage meter windows also keep their saved anchor pinned when resized. The window grows away from the anchored edge or corner instead of drifting from the center.
Shift To Detach
Some anchored windows intentionally resist normal dragging or resizing so you do not accidentally break a layout chain. Hold Shift while dragging or resizing to detach from the anchor and place the window freely.
- Add utility pieces like minimap panels, timers, and group frames only after the core combat cluster feels right.
Core Concepts
Anchoring
Anchoring lets one frame follow another. This is the easiest way to build a HUD that stays organized when you keep iterating on it.
Layering
If two elements overlap, frame levels decide which one appears on top. Most people only need this when intentionally stacking timers, trackers, or center-screen elements.
Pixel-Perfect Positioning
QUI is built to keep bars, borders, and icons looking crisp. Fine nudges and spacing control help the HUD feel deliberate instead of almost-aligned.
Important Settings
| Setting | Description | Default |
|---|---|---|
| Source anchor point | Where on the child frame the anchor attaches | Varies |
| Target anchor point | Where on the parent frame the anchor attaches | Varies |
| Offset X/Y | Pixel offset from the anchor point | 0, 0 |
| Gap | Spacing between anchored elements | Varies |
| HUD layer priority | Render order priority per element (0-10) | Varies |
| Minimum HUD width | Minimum pixel width for the HUD area | Configurable |
| Nudge amount | Pixels per nudge step for fine positioning | 1 |
| Utility auto-anchor | Automatically place Utility bar below Essential | Enabled |
Good To Know
Anchoring is the most efficient way to build a compact HUD. Start by positioning your Essential CDM bar, then anchor your Utility bar, unit frames, and other elements to it. Moving the Essential bar then repositions your entire combat cluster as one unit.
HUD layering priorities only matter when frames overlap. If your layout has no overlapping elements, the default priorities are fine. Adjust them when you intentionally stack elements – for example, placing the combat timer on top of the CDM bar.
Pixel-perfect scaling recalculates whenever your resolution or UI scale changes. If you notice blurry frame edges after changing display settings, type /reload to force a recalculation.